Table of Contents
Just like chicken eggs, duck eggs can also be artificially hatched without the presence of a mother duck. All you need is an appropriate incubator with proper temperature and humidity settings. You can even build a duck egg incubator at home. Any enclosed place or box that can maintain heat and humidity can be used as an incubator for hatching duck eggs. Otherwise, purchase an incubator that suits your hatching needs.
While the incubation and hatching of eggs are pretty simple for poultry birds with the use of an egg incubator, the process is quite challenging and trickier for duck eggs. Some experts suggest that if one has not been able to hatch chicken eggs successfully, one shouldn’t go close to duck eggs. Nevertheless, with this duck egg incubation guide, you should be able to incubate and hatch duck eggs with success.
Step one: Prepare the incubator
The first step in duck egg incubation is to clean the incubator and put it on for at least 24 hours. This allows the humidity and temperature levels of the incubator to stabilize.
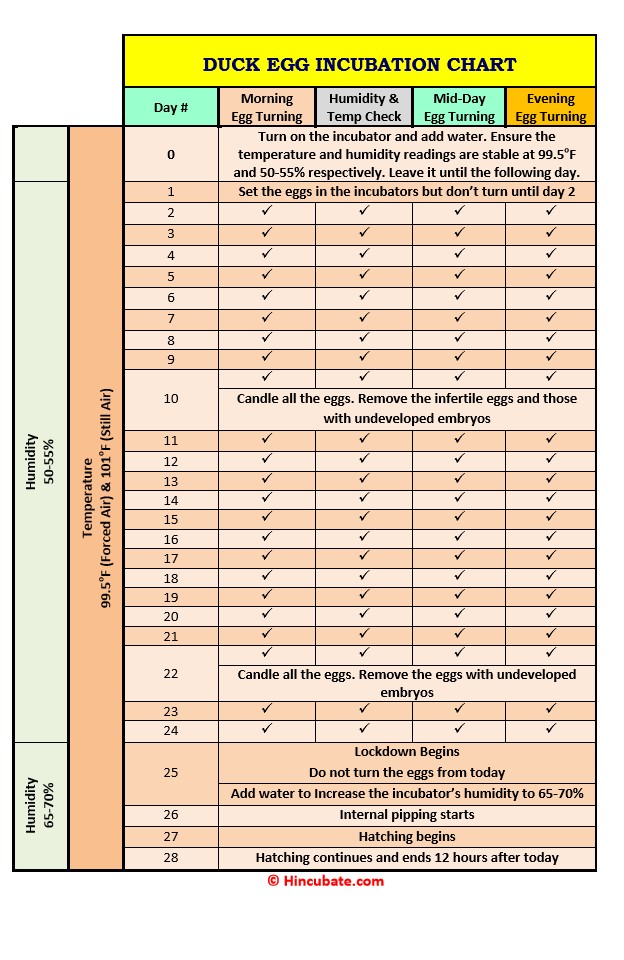
The temperature and humidity requirements for duck eggs for the first 25 days are 99.5oF (37.5oC) and 50-55% respectively. From day 26, the humidity should be increased to 65-70%.
You should pay much attention to the humidity levels of the incubator during the incubating and hatching stages. Duck eggs require a higher humidity during incubation. Hence, if the humidity is not enough, the shell membranes will lose moisture quickly, dry up and contract. When this happens, the developing ducklings will be constricted and stuck within the shell. As a result, they stop growing and moving and will eventually die.
Fluctuating temperature and humidity greatly affect hatch rates. If you discover any instability or fluctuations, troubleshoot the problems or replace the incubator.
Where you place your egg incubator matters a lot to hatching success. Do not place your incubator in the following locations.
- Near a window
- Where there is direct sunlight or draft
- Where there is a possible liquid spillage
- Near a vibrating machine
- Where it will be accessible to kids and pets

Step two: Prepare the eggs
It is important to select healthy, fertilized and dirt-free duck eggs to record an excellent hatch rate. The following duck eggs should not be set in the incubator.
- Extra-large, double-yolk and small duck eggs
- Non-fertilized eggs
- Dirty or soiled eggs
- Cracked or malformed eggs
Read: Poultry Egg Incubation Mistakes
The best way to identify a fertilized duck egg is by candling. You can use a flashlight or purchase a special egg candler for this purpose.
Always wash your hands, before handling your duck eggs or setting them inside the incubator. This is essential to prevent harmful bacteria from contaminating the eggs and infecting the embryos. Also, make sure the eggs are candled and kept at room temperature for at least 12 hours before setting them. Setting cold eggs in an operational incubator could result in cracked eggs.
Step three: Set the duck eggs
After confirming that the incubator is working fine, you can set the eggs. Always wash your hands thoroughly before handling your duck eggs. If your incubator comes with an egg tray, carefully set the eggs on the tray. The large end of the egg should be facing up while the small end sits on the egg tray.
It is advised to mark both sides of the eggshell to easily know if the egg turner is functioning correctly or identify which eggs have been turned and which have not. You can use a pencil to mark an X on one side and an O on the other side of the shell.
Watch the thermometer and hygrometer readings closely after setting the eggs and closing the incubator. It is normal for the temperature to drop for a while and do not attempt to increase the temperature to avoid getting the eggs cooked.
Step four: Turn the eggs and monitor the temperature and humidity
The eggs must be turned from the day you set them until the 25th, 27th and 32nd day, for domestic duck, mallard duck and muscovy duck respectively. If your incubator has no automatic egg turner, you need to do it manually using your hands. The eggs should be turned 3-5 times daily (like once every 8 hours).
Keep a close watch on the humidity and temperature. The temperature should be 99.5oF (37.5oC) and the humidity should be 50-55%. Always add water to the water reservoir when necessary to maintain the correct humidity level. You can candle the eggs again on day 10 to see if the embryos are developing. Instantly remove the eggs that appear clear as it is evident they are dead.
Step five: Stop turning the eggs and prepare for the hatch day
When it remains 4 days to the end of incubation, you should turn off the egg-turning feature of the incubator or stop turning the eggs by hand. This is referred to as Lockdown. This is necessary to allow the ducklings to get settled and develop fully before the hatch day. You should also increase the humidity to about 65-70%.
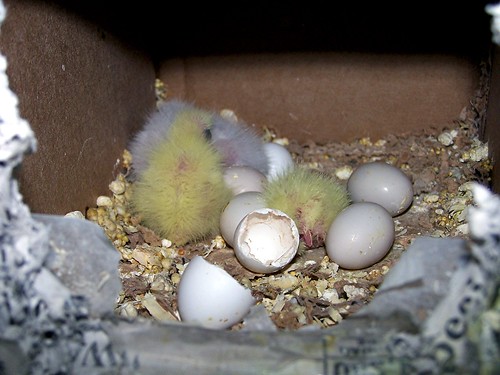
Step six: Hatch day
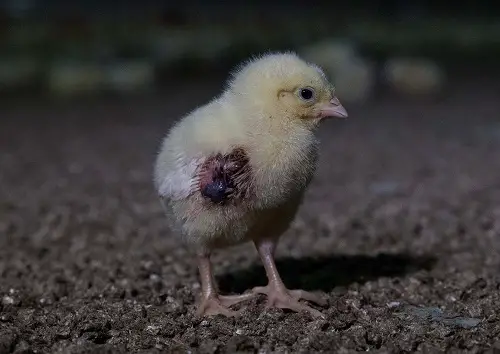
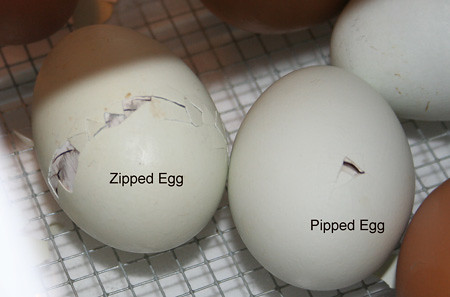
On day 27 (for domestic ducks), the ducklings are ready to pip the eggshell and hatch. Ducklings are known to take much longer to pip and hatch. Even after 28 days, you need to wait for at least 12 hours for all the ducklings to hatch.
You should avoid opening the incubator when hatching starts and do not try to assist any duckling to hatch. Trying to help a duckling to hatch could get it injured. Just allow nature to take its cause.
Step seven: Clean up the incubator
After waiting 24 hours or more for all the ducklings to hatch, move the new ducklings out of the egg incubator. Remove and incinerate all shells, fluffy feathers and unhatched eggs. Thoroughly clean and disinfect the incubator. Please keep it in a safe place.
Duck Egg Incubation Chart
The duck egg incubation chart below was designed for those who want to hatch their duck eggs at home. This incubation chart shows the ideal temperature, humidity, and turning frequency for each day of incubation. It also includes some tips and reminders for a successful egg hatch. You can download the chart as a PDF file or print it.