Table of Contents
Incubating ball python eggs as a beginner is quite easy and rewarding with a little bit of planning and attention to detail. Once the eggs are laid, it’s important to provide them with the right environment for incubation. This will help the eggs hatch into strong, healthy ball pythons.
To incubate ball python eggs, you will need the following.
- Egg box
- Reptile egg incubator
- Incubation medium such as vermiculite
Incubating ball python eggs is not an overly complex process. There are some steps you need to follow to make sure everything goes smoothly. Each step has been described below.
Step 1: Prepare the egg box
The first step in incubating ball python eggs is to prepare the incubator or self-made incubation environment. This involves setting up a container or enclosure that will provide the ideal conditions for the eggs to develop and hatch. Start by choosing a container that is large enough to hold all of your eggs and has a tight-fitting lid to maintain a stable temperature and humidity level. A plastic box or Tupperware container works well for this purpose. Make sure the container will fit in your incubator or on a heating pad if you are not using an incubator.
Clean the container thoroughly with a reptile-friendly disinfectant to remove any bacteria or germs that could harm the eggs. Rinse the container well with warm water and let it air dry completely before proceeding.
Once the container is clean and dry, it’s time to add the incubation medium. This can be a mix of vermiculite and water or a pre-made product like Hamiledyi Reptile Substrate Vermiculite. Follow the instructions on the product label to prepare the incubation medium and add it to the container, making sure it is not too wet or dry. After the incubation medium is in place, you are ready to carefully place the eggs into the container and begin the incubation process.
Step 2: Collect the eggs
It’s important to handle the eggs gently and avoid applying too much pressure or turning them during the transfer. Start by carefully picking up the eggs with your thumb and forefinger, using light pressure to avoid damaging the egg. Keep your open palm beneath the egg in case it slips. Transfer the egg to your egg box and place it in a small indent that you have previously created in the incubation medium. Press the medium gently around the egg to secure it in place.
Make sure to leave plenty of space between the eggs to prevent them from touching. Cover the egg box with its lid and place it into the incubator. If you have multiple egg boxes stacked in the incubator, it’s a good idea to number them so you know which order they stack in and which way they should be placed in the incubator. Any time you take the egg box out, be careful to return it in the same way to maintain the proper incubation conditions.
The eggs in the warmer parts of the incubator will usually hatch first, so you may see a few days of difference between the warmest and coolest spots. Keep a close eye on the eggs and monitor their development to ensure they are incubating properly.
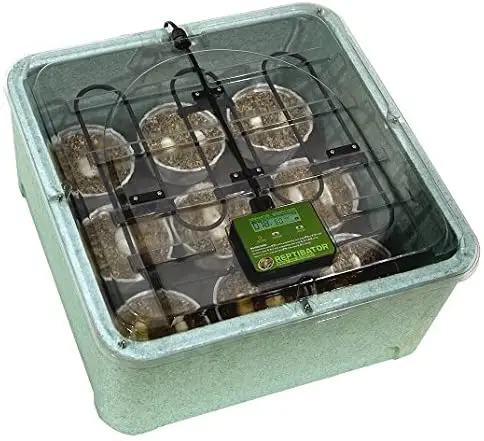
Step 3: Setup the incubator
Before incubating your ball python eggs, it’s important to properly set up the ball python incubator and create a stable and consistent environment for the eggs to develop and hatch. First, choose an incubator that has both heating and cooling functions and can maintain a consistent temperature. This will allow the incubator to quickly correct any changes in temperature and maintain the ideal conditions for the eggs. Look for an incubator that is large enough to hold all of your eggs and has a tight-fitting lid to maintain the proper temperature and humidity levels. In addition to temperature, it’s important to maintain the proper humidity level in the incubator. The recommended humidity level for incubating ball python eggs is around 90-100%.
Below are some of the recommended ball python incubators to achieve high hatch success. They are easy to use and work excellently compared to other ball python egg incubators on the market.


Once you have selected an incubator and set the proper temperature and humidity levels, test it to ensure it is working properly. It’s also a good idea to keep a separate thermometer and hygrometer inside the incubator as a backup. Before placing the eggs in the incubator, make sure the incubator is in a stable location that is free from drafts or changes in temperature. This will help maintain the proper incubation conditions and ensure the eggs hatch successfully.
Step 4: Incubation and regular egg monitoring
During the incubation period, it’s important to maintain the proper temperature and humidity levels in the incubator to ensure the eggs develop and hatch successfully. The incubation period for ball python eggs varies depending on the temperature of the incubator and the species of snake, but most eggs will hatch between 60 and 90 days.
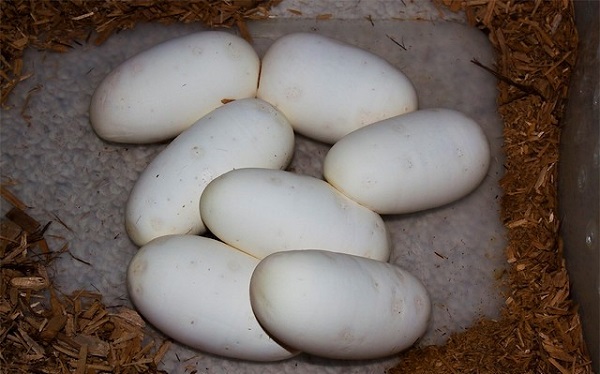
As the eggs incubate, you can check on their progress and health by looking for signs of hydration and viability. A well-hydrated egg is plump and round, while a dehydrated egg is smaller and shriveled. Viable eggs are firm, dry, and white, and may have a chalk-like or mottled appearance. If the eggshell seems to have darkened or collapsed, this may be a sign of dehydration and you should check the humidity level of the incubator and adjust as needed.
Unfortunately, not all eggs will make it to hatching. If you see fuzzy mold growth on the eggs, this is usually a sign that the snake fetus has died. In this case, it’s important to carefully remove the infertile egg from the incubator to prevent bacteria or mold from spreading to the other eggs.
After around two to three weeks of incubation, you can candle to determine which eggs are fertile and likely to hatch. This involves holding the egg over a bright light source in a dark room to see if there is a dark area inside, which indicates the presence of a fetal snake. Candling takes practice and should not be done more than once or twice, as moving the eggs too much can harm the developing snake. Allow the eggs to sit undisturbed for at least a month after candling before checking again.
Step 5: Hatching
As the incubation period comes to an end, the baby ball pythons will begin to hatch from their eggs. Most of the eggs in a snake clutch will hatch within a day or two of each other. During hatching, the baby ball pythons will use an egg tooth, or caruncle, at the front of its nose to break through the shell. The snake will typically break out of the top of the egg, known as “pipping.” After pipping, the snake may remain inside the egg for a few days as it feeds on the yolk sac. It’s important to be patient and not interfere with the hatching process.
Once the baby ball pythons have emerged from their shells, leave them in the incubator until they are completely out of the shells. If your eggs are not hatching or if the hatchlings seem to be having difficulty coming out of its shell, it’s best to call a reptile veterinarian or breeder for advice. Do not attempt to break the baby snake free from the egg, as this can cause harm. Keep in mind that not all eggs will hatch, but the effort is worth it for the healthy baby snakes you do produce.